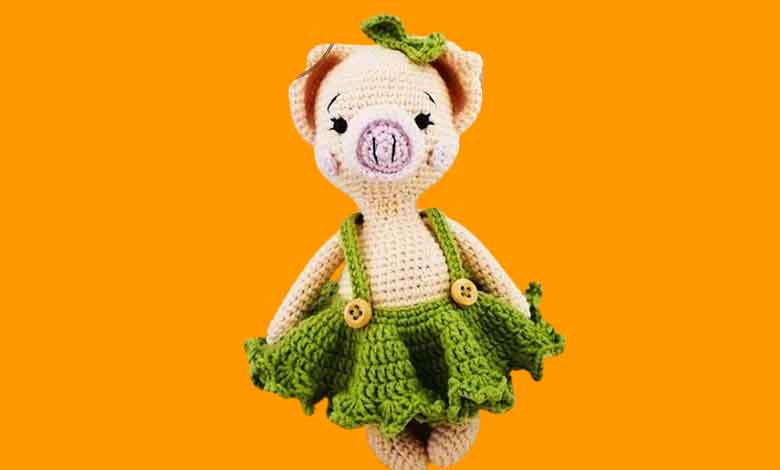
Crochet Pig Pixie Amigurumi Free Pattern. If you want to step into a cute and fun amigurumi project using your manual skills, crochet pig pixie amigurumi free pattern is exactly what you are looking for! This unique design adds a different flair to sewing pig toys and is cute enough to steal the hearts of people of all ages.
With the crochet pig pixie amigurumi free pattern you can unleash your imagination and get the opportunity to create your own special sewing pig. This free pattern includes step-by-step instructions and detailed images so it’s suitable for crocheters of any level. Both beginners and experienced craftsmen can express themselves with this project and achieve a great result.
Crochet Pig Pixie Amigurumi Free Pattern
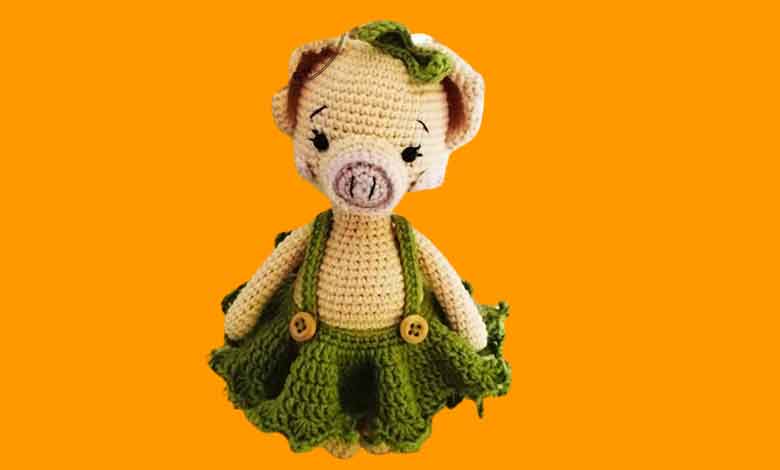
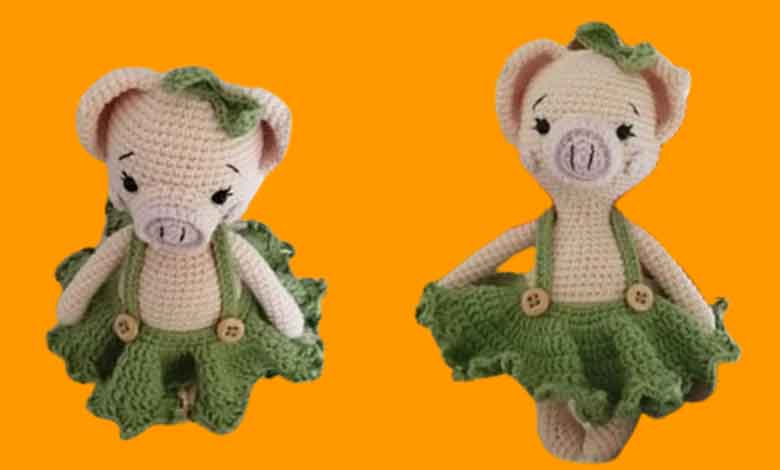
This amigurumi design combines a cute pig character with pixie style. So, you will appear with a striking fez, magical wings and a cute dress. These details make the sewing pig extraordinary and attract everyone’s attention.
In addition to creating your dream sewing pig with the crochet pig pixie amigurumi free pattern, it also offers a great option for gift or home decoration. If you want to make a special gift for your loved ones or to add color to the children’s room, these cute amigurumi toys are just for you.
Try the crochet pig pixie amigurumi free pattern to discover how fun and satisfying this original design is. As you enjoy creating your own sewing pig, you’ll improve your dexterity and nurture your creativity.
Are you ready? Then step into the magical world of your sewing pig with the crochet pig pixie amigurumi free pattern and reward yourself or your loved ones with a handmade toy filled with love. Take action now to start this fun project and enjoy the crochet pig pixie amigurumi free pattern!
ABBREVIATIONS
ch: Chain
sc: Single Crochet
inc: Increase
dec: Decrease
slst: Slip Stitch
hdc: Half Double Crochet
dc: Double Crochet
tr: Triple Crochet
st/sts: stitch/stitches
BLO: Back Loops Only
FLO: Front Loops Only
Bobble: Bobble Stitch
( ): The parentheses at the end of the row give the total number of stitches of that round.
[ ]X.. : Repeat instructions x times
Materials
Alize Cotton Gold / Green (Color code 385)
Yarnart Jeans/ Skin color (Color code 73)
Yarnart Jeans/ Pink (Color code 18)
6mm Safety Eye (Black)
1 cm Wood Button (2 piece)
For embroidery: Black thread
Fiberfill
Pins
Size 2mm or 2.5mm crochet hook
Stitch Marker
Scissors
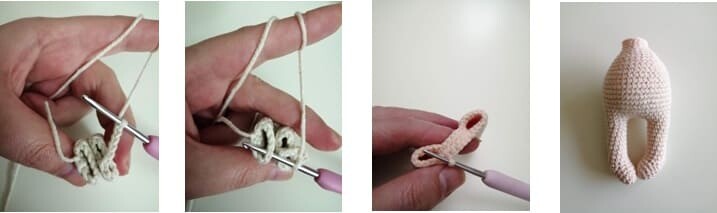
LEGS (with skin color yarn and make 2)
Use a different color long yarn piece to mark beginning of round while crocheting legs. After 9th round foot part will take its shape. Then crochet st at its sideways and front section. After that, legs will be completed by crocheting sc in next 12 st between 10-18 rounds. When first leg is finished, fasten off and crochet second leg. After second leg finished do not fasten off yarn and join two legs with chain. Then continue crochet the body part. Start with legs. After crocheting front foot part of leg, at 6th round heel part will be crocheted. Lastly, after 9th round is completed rest of the rounds will be crocheted and legs will be completed. Don’t forget following instruction images and notes! Join two legs and crochet the body as a single piece.
Rnd 1 start 6sc in a magic ring and join with skin sl st (6) Please look through “Techniques Section” to learn about “Magic Ring” join with a slst. Do not forget to use your stitch marker.
Rnd 2 inc in all sts (12)
Rnd 3-5 sc in all 12 sts (3 rounds)
Yes, friends, we have finished the leg part, now we can start knitting the heels with crochet.
Make heel part
Rnd 6 Ch 1, turn, sc in next 7st (skip 1 st and go in 3rd st) (7)
Rnd 7 Ch 1, turn, sc in next 5st (skip 1 st and go in 3rd st) (5)
Rnd 8 Ch 1, turn, sc in next 3st (skip 1 st and go in 3rd st) (3)
Join foot part and crochet leg
Rnd 9 Ch 1, turn, sc in next 3st, (sideways) sc in next 2st, (in front) sc in next 5st, (sideways) sc in next 2st (12)
Rnd 10-18 sc in all 12 sts (9 rounds)
**Stuff the leg.

Body (with skin color yarn)
After crochet legs, start crocheting body part. Before joining legs make sure legs look toward inside. While joining legs with chain, fold leg at the middle. When crochet up to waist part of body start filling polyester fiberfill. After body is finished fasten off and leave a long tail.
Please follow instruction images!
With Skin Colour
Rnd 19 To join two legs; ch 6,join to the middle of the other leg with a sl st and sc in the next 12 sts of the leg, FLO sc over the ch 6 stitches,sc in the next 12 sts, and FLO sc over the ch 6 sts (36)
Rnd 20-21 sc in all 36 sts (2 rounds)
Rnd 22 [sc in the next 5 sts, inc] repeat 6 times (42)
Rnd 23 [sc in the next 6 sts, inc] repeat 6 times (48)
Rnd 24-27 sc in all 48 sts (4 rounds)
Rnd 28 [sc in the next 6 sts, dec] repeat 6 times (42)
Rnd 29-30 sc in all 42 sts (2 rounds)
Rnd 31 [sc in the next 5 sts, dec] repeat 6 times (36)
Rnd 32 sc in all 36 sts
Rnd 33 [sc in the next 4 sts, dec] repeat 6 times (30)
Rnd 34 sc in all 30 sts
Rnd 35 [sc in the next 3 sts, dec] repeat 6 times (24)
Rnd 36 sc in all 24 sts
Rnd 37 [sc in the next 2 sts, dec] repeat 6 times (18)
Rnd 38-40 sc in all 18 sts (3 rounds)
**Stuff the body.
Now that we have completed the body part, we can start knitting the head.
Head (with skin color yarn)
At head part, when reached the 17th round, start crocheting cheeks. There will be two protrusions at both sides of head. Use a different color long yarn piece to mark beginning of round. Therefore you will increase and decrease stitches at right location. After 23rd round, insert the safety eyes at this point. To find the center point fold the head at the center from cheek sides so safety eyes can be symmetrically inserted. After finish the head, fill the head with polyester fiberfill and continue with creating head form. Please follow instructions images and all notes about crochet steps.
Place the safety eyes between 16 and 17 with 9 stitches gap between them.


Rnd 1 Start 6 sc in a magic ring and join with skin slst. Insert your stitch marker.
Rnd 2 inc in all sts (12)
Rnd 3 [sc in the next st, inc] repeat 6 times (18)
Rnd 4 [sc in the next 2 sts, inc] repeat 6 times (24)
Rnd 5 [sc in the next 3 sts, inc] repeat 6 times (30)
Rnd 6 [sc in the next 4 sts, inc] repeat 6 times (36)
Rnd 7 [sc in the next 5 sts, inc] repeat 6 times (42)
Rnd 8 [sc in the next 6 sts, inc] repeat 6 times (48)
Rnd 9-16 sc in all 48 sts (8 rounds)
Rnd 17 [sc in the next st, inc] repeat 6 times, sc in the next 12 sts, [sc in the next st, inc] repeat 6 times, sc in the next 12 sts (60)
Rnd 18-19 sc in all 60 sts (2 rounds)
Rnd 20 [sc in the next st, dec] repeat 6 times, sc in the next 12 sts, [sc in the next st, dec] repeat 6 times, sc in the next 12 sts (48)
Rnd 21 [sc in the next 6 sts, dec] repeat 6 times (42)
Rnd 22 [sc in the next 5 sts, dec] repeat 6 times (36)
Rnd 23 [sc in the next 4 sts, dec] repeat 6 times (30)
Rnd 24 [sc in the next 3 sts, dec] repeat 6 times (24)
Rnd 25 [sc in the next 2 sts, dec] repeat 6 times (18)
**Stuff the head.
When performing body and head sewing, mark with proof pins. There will be gaps in between when sewing two pieces. Add fiber. If you do not fill the right amount of fiber, the gap will remain and the head will not stand properly. Please do not forget to follow the images and rows!
Now that we have knitted the head part of our Amigurumi character, we can now start making that beautiful nose.
Nose (with pink and skin color yarn
The nose will be triangular. Place the top corner of the triangle on top of the head and mark the place with proofing pins. When planting, fill it with fiber. Please do not forget to follow the images and rows!
Rnd 1 Start 6 sc in a magic ring and join with pink slst. Insert your stitch marker.
Rnd 2 [sc in the next st, inc] repeat 3 times (9)
Rnd 3 [sc in the next st, 2 inc] repeat 3 times (15)
Rnd 4 [sc in the next 2 sts, 3 inc] repeat 3 times (24)
Change to skin color

Rnd 5 BLO sc in the next 24 sts
Rnd 6 sc in the next 24 sts
** On the 5th row, pass sc in the next 24 sts on the BLO with a pink rope.
The nose of our cute pig character is finished, now the ears are next. Let’s start knitting the ears with crochet.
Ears (with skin color yarn and make 2)
Ears; Mark the left and right sides of the head between 4-17 rows with proof pins. After determining their location, you can complete the sewing process. Treat your eyebrow and nose with your black embroidery thread. Please do not forget to follow the images and rows!
Rnd 1 Start 6 sc in a magic ring and join with skin slst. Insert your stitch marker.
Rnd 2 sc in the next 6 sts
Rnd 3 inc in all sts (12)
Rnd 4 [sc in the next st, inc] repeat 6 times (18)
Rnd 5 [sc in the next 2 sts, inc] repeat 6 times (24)
Rnd 6 [sc in the next 3 sts, inc] repeat 6 times (30)
Rnd 7 sc in the next 30 sts
Rnd 8 [sc in the next 4 sts, inc] repeat 6 times (36)
Rnd 9-10 sc in all 36 sts (2 rounds)

We knitted the ears of our amigurumi pattern, we can move on to the arms.
Arms (with skin color yarn and 2 make)
At 17st round start filling arm with polyester fiberfill. Then finish18nd round and join stitches to close arms. Fasten off and leave a long tail to sew arms to the body. Place arms at shoulder section of body as narrow section of arms are looking towards the outside (Shoulder section of body is 3 rounds below from head). Please follow up the instruction images.
Rnd 1 Start 5 sc in a magic ring and join with skin slst. Insert your stitch marker.
Rnd 2 inc in all sts (10)
Rnd 3-5 sc in all 10 sts (3 rounds)
Rnd 6 dec, sc in next 6st, dec (8)
Rnd 7-17 sc in all 8 sts (11 rounds)
Rnd 18 [dec] repeat 4 times (4)

After embroidering the sleeves, do not forget to knit the cheek patches of our amigurumi pig toy.
Cheek Patches (with pink color yarn and 2 make)
Rnd 1 Start 6 sc in a magic ring and join with pink slst (6) Break the yarn leaving a long tail for sewing.
Now that we’ve completed the cheek patches, now comes the green crochet dress of our amigurumi pig pattern. Let’s finish this with a beautiful dress.
Dress (with green color yarn)
Crochet dress separately from body.
With Green Colour
Rnd 1 Ch 46
Rnd 2 Start in the second chain from the hook, sc in the 45 sts (45)
Rnd 3 Ch 2, [DCinc] repeat 45 times, slst (90dc)
Rnd 4 Ch 2, [dc in the next st, DCinc] repeat 45 times, slst (135dc)
Rnd 5-6 Ch 2, dc in all 135 sts, slst (2 rounds)
** To make borders of the hat; In same st make { [dc in the next 3 sts, Ch 5, dc in the next 3 sts], Then skip 2 st and sc in 3nd st.} repeat 45 times

Braces(with green color yarn and make 2)
With Colour Green
Row 1 Ch 31
Row 2 Starting from the third stitch from the hook; sc in the next 30 sts
Bow(with green color yarn)
Rnd1 Ch17
Rnd2 1sc, 1hdc, 3dc, 1hdc, 1sc, 2 sl-st, 1sc, 1hdc, 3dc, 1hdc, 3sc on the last stitch, do NOT turn, crochet on the other side of the chain
Rnd3 1sc, 1hdc, 3dc, 1hdc, 1sc, 2 sl-st, 1sc, 1hdc, 3dc, 1 hdc, 1sc. Fasten off.